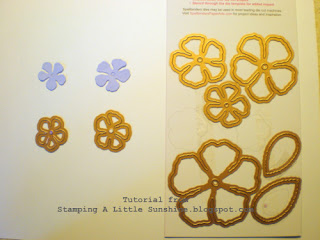
As I promised you here is the tutorial on my homemade pansies!
I am most happy to share with you all, how I did this. I hope this tutorial will help you and inspire you to try and make some of your own pansies?
Use the Spellbinders "Rose Creations" die cuts for these pansies. Take regular colored paper of your choice. I used lavender here. It does NOT have to be water color paper even though you will be using water color inks to color your flower.
Step One:
Run the size of your choice rose die cut through your Die Cut machine. I used the 5th size die cut on the left side.
Step Two:
I also cut an extra one (the smallest size) to make another pansy a size bit smaller when getting done with my first pansy.
Step Three:
Take the flower and now cut three pieces off of the original rose die cut. Leave a tiny portion of the center with the two petals.
Step Four:
I used a Tom Bow Water Color Ink Pen (light lavender color) and my bendable color brush pen that is filled with water to blend the ink with your Tombow Ink Pen.
Step Five:
Make a few lines like a pansy has on a real flower in the center with your Tom Bow ink pen. Now take your blender pen and with only a slight bit of water brush some water over the lines and it will now pull color off the lines giving it the look of water color on your flower. The trick is to not use too much water at all. Go very sparling as you can add more water if need be. Be sure to let it dry. (see below). You will notice your lines may have seemed to disappear after using the blending pen with water. That's ok...because after your certain that your petal is dry you can add more lines with your lavender Tom Bow pen. Adding a few more lines over the ink makes it look more real like.
Step Six:
Now after the ink is dry take some liquid glue and glue the two petals to the extra tab you left (hiding the extra center). It should then look like the picture below.
Step Seven:
Now take a glue dot and adhere it over the top of the center of two petals. By raising this piece up with a glue dot it gives it a dimensional look. Then take a yellow Tom Bow Marker and add a yellow center to it and add another black or brown dot to the center of the yellow dot. All real pansies have a yellow center.
Step Eight:
Your all done!
Here is the finished product in my hand, this should help to give you a visual of how large it is in my hand.
Here is a picture of the my first project I shared with you in a previous post two weeks ago, of my pansies. I placed my new pansy next to my notecard envelope for to see how it looks next to the envelope, I made. I hope this tutorial was beneficial and you will try it yourself?
I would love hearing from you, if you try this? Either leave a comment on my site or email me with a link to your blog with a picture of your flowered pansies or pansy on a card. I would love to see what you've done.
Happy stamping and crafting ladies! I hope you return soon?


Leanne, this was a wonderfully done tutorial...thanks so much for sharing. I don't have that particular die, but I am so many other flower dies...be interesting to try one of those first to see if they work...if not, that die is on my wish list...Hope you have a good week. Blessings, Jill
ReplyDeleteLove how you made those pansies!!
ReplyDeleteHappy Easter blessings!
Jacqueline
Thank you Leanne, that was a great tutorial for the pansies on your splendid card! My husband can wait every spring to plant them.
ReplyDeleteHere's a great tutorial for the quilt card you commented on of mine:
http://stampinat6213.blogspot.com/2007/07/quilt-card-tutorial.html
Thanks for stopping by!