Sunday, September 30, 2012

Scenic Cards...


I recently made several cards with scenes using some alcohol inks and distress inks and some chalk inks with my sponge dobbers. I experimented with different versions? Anyone who knows me and my usual card style knows this is really out of my usual realm or comfort zone.   One afternoon I got real busy and decided to make some cards with scenes. The card with "Get Well Soon" was done with alcohol inks sometime ago so I do not have a close up of that one. I sent that one out already to my one brother who was recovering from surgery some time ago.  
 
Here is what I came up with.  Below you can view each card separately for a closer look.
 
 
I actually glued real sand and glued a couple of real sea shells on this first card. You can see it if you look real close.  This card was done with my alcohol inks and shinny paper as recommended with Tim Holtz. Word of caution...the glued sand comes off during mailing so I don't recommend doing that unless you hand deliver your card.
 
 
I thought this one (above) would make a nice sympathy card. 
This one was done with chalk inks and my sponge dobber.

 
This bird is popped up with a pop up dot to add dimension. 
This one (above) was done with alcohol inks.

 
This one is also popped up with a pop up dot on the boats sail.
Both above and below were done with my chalk inks and dobbers.

 
This sail is also popped up. 
 
 
The deer is also popped up to add dimension to this card.
This was done with my chalk inks for the sky and water and then
 used my regular pigment inks for the trees and water reflection.


Truthfully, I enjoyed making these.    Sometimes it's fun leaving your usual comfort zone and give a try to something different. It was fun trying to figure out how many different types of scene's I could come up with?  However, I have to admit that I used other blogs for inspiration to my scenery ideas.
 
Having the bird stamps, palm tree, evergreen tree, cat tails, and two different types of sail boats among my stamps, it helped to me to  create a variety of  scenes.  These scenes make great cards for a man.  So, I put them away until I need a masculine card or two for a friend sometime? 
 
 
Happy crafting to your day ladies! 
 Why not leave me a comment before you leave?
 

Sunday, September 16, 2012

Birthday Card For A Dear Friend

 
I actually have two very special girlfriends this month by the name of Sandy that I sent cards to for their birthday this month. 
 
 
Well....this one was for my dear long time high school friend Sandy. 
Sandy loves feminine things so I hope this suited her fancy? 
 
 
Adding a soft feather at the left corner and top right added a sense of  real softness on this card. These are two of my favorite Marianne die cuts so I put them together and love the way they look here.
 
Thanks for peeking!
Hope you'll stop by again real soon.
 
Why not let me know you stopped and leave me a comment and
tell me your thoughts on this one?


Sunday, September 9, 2012

Glitzy Recycled Box and Card...

I promised I'd be back with another card and more of my glitzy paper for you....

So... I'm back with more of my pretty glitter paper and a special little card
and  matching project for you today.
 
 
Some time ago, Selma of Selma's Stamping Corner inspired me with her pretty little recycled  "Laughing Cow Cheese Box".  Thanks....Selma!  The idea was fantastic and your box was beautiful!
 
 
I embraced  her lovely box and wanted to try a stab at it myself.  I happened to have a empty Laughing Cow cheese box waiting. I was inspired by her and decided to use my pretty glitter paper  on this project. I decorated my box first and then decided I needed a card to match the box.  I think this makes a lovely two-some, doesn't it?

 
I also decorated the inside of the box with soft pretty flowered paper to make it look nice inside as well.
 
 
 I do love those Hershey chocolate candies!  I know of few people who don't like a piece of chocolate candy, now and then?  So what could be better to fill up a box?
 
I used my daisy flower paper punch to make cute sparkly little flowers and attached them to the top of each candy and attached a light pink rhinestones to the center of each flower to add more bling.
 
Now...I didn't put it in my picture but I do plan on putting pretty iridescent grass on the bottom of the box to look more feminine when eventually giving this away at some point with the matching card.  I most likely will save this until Christmas time to give it away then, as it does look like a bit of a Christmas theme with the red glitzy paper and reddish large roses and green leafs.
 
 
Again I tried to photograph this in the sun to catch as much glitz on the paper for you. My sweet blog friend Jill is right, photographing our cards sometimes just doesn't do them justice.
 
If this is something that you particularly liked,  please leave me a comment,
 so I know you where here today?  I look forward to comments.  Thanks for stopping by here today!
I look forward to having you...

Entered in: Stampin Sisters In Christ – bright colors only (no black, brown, neutrals)
 

Monday, September 3, 2012

Bling...Bling!

 
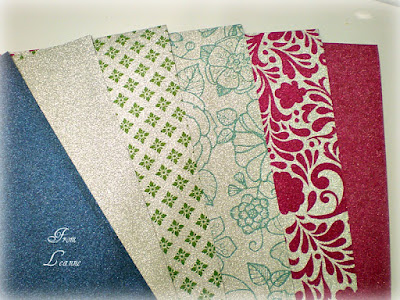
While recently visiting and having quality time with my daughter in her craft room she brought out these most delicious papers from a book she had bought and had stashed away in her craft room and asked me...."Mom, would you like to take some of these with you"?  I immediately said yes....it was a no brainer since I could see how lovely they were and what "BLING" it would add to a card. One thing I can say is... my daughter is so very giving and generous.    That's one of her biggest assets that I love about her.   Thank you sweet Traci!
 
If you ask me what book these papers are  from, I can't tell you, as I never asked to see who made the yummy looking papers?  I just knew I liked them!  There is no manufactures name on the back of the paper to let you know?  If you happen to know, just email me (on my  blog e-mail address in the right hand column) and I'll let everyone know.
 
 
Here are the yummy papers she sent me home with. I wanted to share them with you to see how pretty they are.  As you can see, I was drawn to the turquoise rose paper and made this birthday card for my dear friend Sandy who's birthday is this month.  I shot the card pictures outside so you would be able to see how nicely they bling with the  bright sunshine on them.
 
 
I used my Stampin' Up embossing folder "Manhattan Rose" and cut out the rose only and used my turquoise chalk inks with my sponge dobber to add this color to match.  I made my own larger roses with the same chalk color and added the silver ribbon and rhinestones that I had on hand to really help bling it up a tad bit more.  Girls can never have to much bling!
 
 
I look forward to using some of the other papers soon and to share my creations using the papers and with you soon.


Sunday, September 2, 2012

A New Look!

Incase your confused, don't be!  Yes...you are at the right place.  I have been toying for a while for another new look to my blog.  I hope you like it? 

Years back when I worked, we were always told at our meetings that in the world of business there's one thing you can always be sure of and that is CHANGE!   Change can be good? (Sometimes)!  So I'm prone to change thing up a bit from time to time and this is one of those times.

So glad to have you stop by again.  I hope my blog interests you and keeps you coming back for inspiration.  Please leave me a message and to let me know you were here?  Otherwise I won't know.

Don't Forget To Leave A Comment...

Related Posts Plugin for WordPress, Blogger...