Sunday, September 7, 2014

More OF My Homemade Pansies....


Welcome to my little corner of the world today and glad you found your way to stop in here.  I hope you've come by today for some more inspiration and a quick peek of this soft and pretty little creation I have waiting for you today.  

I actually set out with this card to take the die cut I had from Joy Crafts # 6002/0147 and make it fit a oblong card size 4 -1/4 X 5- 1/2  rather than the square size 4 -1/2 X 4 -1/2  die cut size that really is intended to be.   I actually cut it into quarters (4 separate quarter squares) while placing each quarter in the the corner of the card with pop up dots.  I then took my Spellbinders Nestabilities Floral Ovals and used two sizes to hide the corner cuts.  Making them look like it was one die cut to fit the card size.  I was happy with the result.

The next best thing I did here was to make more of my homemade pansies that I made out of Spellbinders Rose Die Cuts to form and make my own version of pansy flowers.  I had previously made these flowers for another card and project back in March of 2013 and you can find my directions to make these on another post by clicking.HERE in case you missed it.

The directions and post from March 2013 named "Tutorial On Homemade Pansies" is really very simple so don't be dismayed into thinking they are two hard to make?  I trust my directions will lead you along?


Why not let me know if you tried making your own version of the pansies and let me know your results?  I'd love hearing from you?

Sunday, August 31, 2014

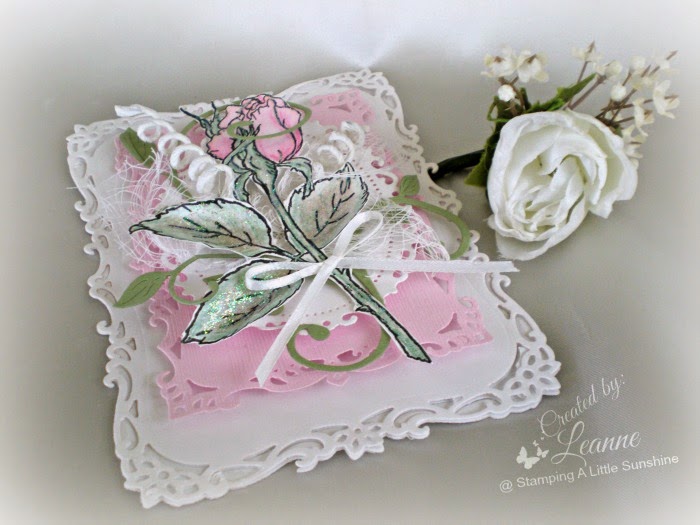
Long Stem Rose....

I love this rose stamp and rarely use it.  So after making a pretty background frame with Spellbinders Nestabilities "Timeless Rectangle" I decided the "TImeless Rectangle"  might look pretty for the focal point along with the rose?  
The pink center paper frame is from Spellbinders Nestabilities called "Decorative Labels Eight".  I then overlapped Spellbinders Nestabilities "Floral Ovals" before over lapping the rose stamp on top. 
I lightly smeared glitter all over the leaves and outline.  I then crunched the large leaves to give it more depth rather than leaving the leaves flat. I used the green leaf die cut called " B117 Fanciful Flourish" to the background of the rose .   I added a tiny bow and some white covered wire and spiraled the wire and added gauge to the background hoping to give it a little more whimsical character?
Again, pink and green are two of my favorite color combinations together.  

Have a fantastic week everyone!

Sunday, August 24, 2014

Black Eyed Susan...

 
I hope I'm correct in saying that these flowers are Black Eye'd Susan's.   Truthfully, I am not much of a gardener so I really don't know all types and names of flowers.  However, I managed to pick up this die cut  a couple years back at a Scrap-show I attended.  I've always been fond of it but haven't used it much.
The die cut is from Joy Crafts called Vintage Flourishes # 6003/0030.and I love the silhouette simplicity of it.  However, I did cut out two of them and reversed the image to make it appear fuller here. 
The fern leaf  stamp is from Stampin'-Up.  It is a very old stamp set called "Organic Grace".  The skeleton leaf is from Michael's Arts and Crafts store that I've had for sometime.  The sentiment is again from Stampin'-Up and from the stamp set called "Whimsical Words":
For the background I used some of my re-inkers of green and blue placing dabs of color all over the watercolor paper.  I then lightly misted water all over letting it run all over the paper to give it a soft water color background while letting it form it's own coloring to the background.  Unfortunately, I'm really not happy with my photography here as it leaves you guessing on how vibrant and pretty the colors really turned out here. 

One more thing before you leave I would like to share with you a sneak peek of my new watermark logo you will be seeing more of in the weeks ahead on my photos.  Thanks for stopping ladies!   Hope you have fun stamping and creating this week?

Sunday, August 17, 2014

Coastal Birthday Greetingsl ...

This card got a huge Thank You from my son-in-law.  He happens to enjoy the beach whenever he and the family can go to the coast for a vacation.  I think it's like most of us....the coast adds relaxation and refreshment to the soul. 
We recently had been to the beach together with him, my daughter, and adorable six year old grandson for a quick vacation so I thought what could be more fitting than a ocean themed birthday card.  This is a clean and simple card.  What could be easier?  Black ink, white paper and some cute little Sandpiper birds and cattails stamps from my collection. 
It gave me great joy knowing he really enjoyed receiving this card this year for his birthday. {{{smiling}}}
I hope you are all enjoying your summer and maybe a trip or two to the ocean at some point as well for some of your own relaxation and fun?


Sunday, August 10, 2014

Simple Happy Birthday Card...

Recently I was at my daughters home visiting and she was gone to work.  To pass some time I helped myself to her crafting room in her basement.  I needed a quick card for my niece's up coming birthday.
I helped myself to this most beautiful lavender paper she had from who else but..... Stampin'-Up.  The picture once again does not do the color justice.  It is the most beautiful shade of lavender blue I've ever seen.  
She also had this pretty little Happy Birthday stamp so I stamped the inside with Stampin'-Up's pretty lavendar ink that I also used on the outside.  I really don't remember the exact color name?  Sorry?
I used this pretty lace boarder stamp that I also think is from Stampin'-Up but not quite sure? The stamp set is also from Stampin'-Up.   I think Stampin'-Up really gets the star for this card, don't you?:  

So happy you dropped in for a peek!


Don't Forget To Leave A Comment...

Related Posts Plugin for WordPress, Blogger...