Monday, December 31, 2012

A Blue Christmas...

 
First I'd like to wish you all a Happy and Prosperous New Year in 2013.


I enjoy giving a little hand made gift now and then.  Especially when I find an idea that others are so gracious to post on Pintrest or their blogs.  I've posted something similar before and posted it to my blog in a different design. I made two of these for gifts to give to two of my favorite neighbors for a little gift this holdiay season.  Since I'm not much into baking and giving out Christmas cookies like others,  this is my way of showing my love for them at Christmas.


I made this small and simple card to match. I stamped a Merry Christmas inside.  It is only 3 1/2 x 3 1/2 inches.  I had some small envelopes that size and attached it to the cello bag with the blue bow. 

 
Here is a close up of the top of the pad.  I used sparkle silver paper and added little sliver rhinestones to the center of the two large snowflakes.  I attached a tag and left it blank so they would be able to use it later, if they wished.  Each of my neighbors loved this gift.  They thought it was so cute.  I thought by making it in blue they would not mind having it around during the year other than Christmas.
 
I hope you holidays have been memorable? 
 
May your New Year in 2013 be filled with blessings.
Leanne


Sunday, December 23, 2012

Dinner Place Cards and Matching Christmas Card...


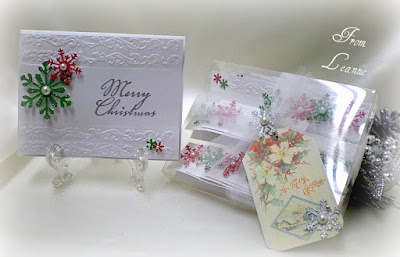
My dad has the most sweetest girlfriend  Gerri who is 80's young (I won't give her real age away here).   Each Christmas I try to come up with a little gift idea that I can make and give to her.  This year I came up with the idea of place card settings for her dinner table.  Since she loves to entertain formally she usually has place cards set at her dinner table so each guest knows where to sit.  One evening I though  of this idea to make and give her some of my own  homemade place cards.  She usually has a large group of people each time she entertains for dinner. I've been invited to quite a few of her lovely delicious dinner parties.  So I wanted to make her at least 12 place cards to match with a Christmas table theme.
 
 
I used my snowflake punch and made 6 in green and 6 in red to break them up a bit and blend in with Christmas colors that she would set her table with.
 
 
My next problem was now....how do I wrap them?  I had purchased some clear cello box's last year while attending a scrapbook show.  They finally came in handy.  It was still a little hard to place them inside the box and arrange them in a way to look evenly balanced inside.  That's why it may look a little strange when viewing this picture?  I inner-connected and some are upside down etc.
 
 
I was lazy and didn't make a tag to match.  Perhaps I should have?  Instead I down loaded this pretty little Christmas gift tag from a talented women Astrid who lets you print freebies from her website.  I took advantage of her efforts.   Sincere appreciation to Astrid. 
 
 
I hope Gerri enjoys these little place cards?  And...I hope you're enjoying your Christmas holidays!
 
Merry Christmas friends....!!!


Monday, December 17, 2012

Poinsettia Card...

 
Earlier this year I attended a Stamp Show and ran across a both that demonstrated burnishing micro fine glitter and using stickers. However for the life of me I do not remember the name of the booth or company to give credit to?  I fell in love with the fine glitter technique and is really quite simple to do. Just a tad messy with glitter everyhwere if your not careful?  I watched how the women demonstrated the technique and decide it would be so nice on a  Christmas card or two of my own.

 
If you take a careful look you will notice both of these cards are done a little different.  With my first card (above) I burnished the bottom of the card in green micro fine glitter and also embossed it with with my Stampin' Up embossing folder called Petals to both the top and bottom.   In the second card I just did the card in a green Bazzill paper and added some silver stickers that I had on hand to each corner.  I love the special silver paper I also purchase at the show and embossed it.  It gives it such a clear crisp look.
 
 
Here is a close up of the poinsettia sticker and micro-fine iridescent glitter for the background. I think I need photo classes to catch the fine glitter here because my picture does not do justice to this glam. 
 
Wishing you all a swinging  Merry Christams....Leanne 
 

Monday, December 10, 2012

Happy Holidays...

 
Usually in June or July I begin to think about my Christmas cards that I will make to send out to each of our out of town friends and family.  I usually make between 30-35 cards. So I begin the arduous task early in the year so that I'm not rushed.  I try to make them simple and without to much dimension them so that I will not have to pay extra postage.  Half way through making them I say to myself; "this may be my last year to make my own Christmas cards to send to everyone"? 
 

 This was what I came up with for this year and have finally mailed them out so it's now safe to post them for you.  I used vellum paper to embossed the ornaments and then took a small amount of silver paper to emboss a ornament and cut it out for each card and placed it on top of the middle ornament with a glue dot.  I added a silver bow I made for each card and also used three tiny sliver snowflakes and attached it to the card.

 
This was the Christmas verse I chose to put on the inside of each card.  I generally prefer Merry Christmas to the front of my cards each year.  However, I did not have a stamp small enough to fit the space on the front of my card.  So I used Happy Holidays in red ink instead this year.
 
 Wishing you a blessed Christmas Seaon!


Sunday, December 2, 2012

Let It Snow, Let It Snow, Let It Snow...

 
I had a special request from a dear friend that asked me if I could make a special Christmas card for each of her three children so she could give them to them this holiday season.  I said;  "how about snowflakes on it"?  She agreed and here is the final outcome.  She was pleased when I gave them to her.  Once again it's so difficult to photograph all white cards.

 
I was able to type a very nice Christmas verse in the inside of each card and printed their name on each card to personalize it.

 
I started out with my Cuttlebug Embossing folder and stamped the background with pretty little snowflakes on it.  I managed to also use my double sided Sookwang tape and Glitter Ritz Micro Fine Glitter (to burnish it) and glam it up a bit on the bottom and then stamp Merry Christmas on it. 
 
I used 2 different sized Martha Stewart snowflakes and my Marianne Designs Die Cut (shaped like a huge snowflake). I also used a very tiny little snowflake punch from Michael's Arts and Craft store from their $1 bin and stamped them in silver glitter paper to set off the white snow flakes and to add more glitter to the card.  I also dabbed a tiny amount of Stickles Iridescent Crystal color all around each snowflake to make it look as if each snowflake was glistening in the sunlight. 

 
I hope these pictures give you the general idea here? 
 
May you all get working and stamping like Santa's little elves and soon
share a crafty little Christmas with your family and friends.
 

Sunday, November 25, 2012

Man's Card

 
Recently it was my brothers birthday and here is the card I sent him.  I think he will have a special attachment to this card as soon as he opens it, as this was him, fly fishing in Patagonia, Chile.
 
 
I once again took the original  photo and made a copy of it with my scanner/printer and cut it to attach to the card front.
 
I have this stamp called "moments" and have used it recently on several cards I've posted on my blog. I think it is a nice masculine stamp that adds interest to a man's card front.
 
 
I also used gauge and put some green chalk ink on it with my daubers to add color to the white gauge..  I reminds me allot of a fishing net to the background? 
 
I hope that your day is a pleasant and crafty day!
 

Sunday, November 18, 2012

Double Stamping Card #3


I've posted three weeks in a row now my cards with double stamping. This is the last week of my posts double stamping cards.  I truly enjoyed doing this technique. But soon it's off to something else for you.  The next few weeks I hope to get into a little more of the Christmas spirit. But before I do next week I'll be back with another masculine mans card for you.   Hope your week is a crafty one?
 
Thanks for stopping by. I always enjoy having you stop by my place.  So why not leave a comment to let me know you stopped?  Please don't be shy....

Sunday, November 11, 2012

Double Stamping Card #2

 
As promised... here is another card I made using the double stamping technique as I did last week.  Yes...I used the same folder as my last posted card and used the stamp"En Francais" on my background here but no cheese cloth stamp this time.  This time I just stamped the french script writing in white embossing powder and applied green and brown over the background with my ink daubers.
 
 
I then used blue ink and stamped my flowered stamp.  One thing I forgot to mention in my last post was after stamping my flowered stamp  with water based ink  I lightly sprayed water over the stamp.  This gave it a little watered effect to on the paper.   Unfortunately, the picture does not pick up the look well.  Do notice the stamp then does not cover over the white writing.  I like that effect.
 
 
In my scrap paper box I found some blue printed paper and used it in the background and used a lighter green paper making a double frame around my double stamped paper.  Adding a bow and silver square dots just adds a touch more.  I'm the ready to put a computer generated verse to the inside of this card as I choose for the occasion, when needed.
 
Hope you like it as well as last weeks card?  It was great having you stop by.  Have a wonderful week! 
Blessings to all from Leanne

Sunday, November 4, 2012

Double Stamping Card #1 ...

 
A couple weeks ago I decided to play around using some double stamping to my cards background. I thought some old fashion stamping would add interest to my background rather than using a embossed background with a embossing folder, as I so often do.  I was inspired by seeing others do stamp resisting. However, I didn't really do this here but found that using my daubers and ink gave it a similar look.   So...I began with a stamp from Stampin' Up called En Francais and stamped it first with white embossing ink.  I made sure to only stamp a portion of the stamp so it looked kind of unevenly stamped and only to the left side of my card.  I then used my stamp from Rubber Necker Stamps called  Cheese Cloth and stamped over it in bright green ink. I so love this Cheese Cloth Stamp... it's a favorite of mine.  I then used my stamp that looks like weeds and flowers (sorry..I do not know the name or manufacture of this stamp) coloring it with my Tombo Pens with different colors to the flowered weed, stems and leaves. 


I also took brown ink and used my daubers inking brown to the background thus giving it more texture and color. 
 
 
I was pleased to show you this particular card after finishing as, I was pleased with the results.  In the next few weeks I hope to share a few more cards I've done by doing a similar background. I've had a great  deal of fun doing them.  As you know I like doing a variety of different card ideas and try not to stay on one particular style of card for a long time.
 
So...thanks for stopping and I do hope you leave me a comment as to whether you liked this or not? I also like to know you were here?  Why not give me a shout out here?
 

Sunday, October 28, 2012

Thank You...

 
This particular actual card started out as an experiment.  Several years back before I purchased my Big Kick I was at a stamp store and bought plain white cards with a cut out square window in the center.  I got to thinking about a stamp set I had from Stampin'-Up called Vintage Vogue.  I wondered if the stamp here would be about the right size to go around the square.  So away I started to stamp it.


This is what it ended up like.  I really like this card because in real life it looks so very soft and pretty with the different pastel  colors of colored chalk that I dabbed onto the card with my ink dobbers and over the stamps.  I used several colors to add interest.  I hope this close up picture (above) helps you to see the coloring a bit better?
 
 
I stamped and colored the inside as well.  I then stamped the inside with this little verse that comes with the stamp set.  I truly love this stamp set and really haven't used it all that much.  I also colored each flower with a different color and placed a colored rhinestone in the center to coordinate and used a pop dot to give it dimension.  The "Thank You" on the front is from another stamp set from Stampin'-Up called Wonderful Words.  That stamp set is another favorite of mine that I do use often.

 
I hope you enjoyed stopping by today and return soon.  Before you leave why not leave me a comment to let me know your were here? 
 
May your day be blessed! 

Sunday, October 21, 2012

Grab A Paper & Pen...

 
This year for my birthday my sweet daughter sent me a lovely birthday card she made with a cute little paper and pen set.  I was pleasantly surprised when opening the card and package knowing she made both.   I loved this idea she found on Pinterest.  She made me a darling little pad and matching pen very similar to the ones here.   I mimicked the idea and used some of my scrap paper with these since it doesn't take much paper to do them.  I used anything I had to glam the paper pad up!  I then wrapped them in cello bags and put a bow around them and a tag on each of them. 
 
I gave the blue and pink ones (shown above) to my two nieces when visiting with them recently.  They just loved them!!!  I always try to have a quick little gift I've made to give them, when I see them.  Who doesn't love a cute little gift made with love?
 
 
I have a dear acquaintance of mine and it was her birthday this month.  Jackie is her name and she works hard at a government office so I thought she may like it and surprised her with this card and the pad (shown below) to match for her birthday.
 
 
Now I couldn't just let it go at that with only a card and decorated pad with out taking a blue paper gift bag I had and tried to make it all... match slightly.  I dropped it off at her office one day last week and I hope she liked it? 
 
I also used a large piece of magnet that I had and glued it to the back of the pad in case the person may want to use it on their refrigerator or anything metal to hang it.  (I always save the magnets with advertisements on them that sometimes come glued on to the front of your White or Yellow Page directories that the phone company sends you each year).  Also, be sure to take the tip of the pen and unscrew the top or bottom (if it comes off) and cut a piece of matching paper and wrap it around the ink refill and put it back inside to match your paper you used to decorate the pad with.  Look hard and you can see the pen matches the paper here.  I also took white tissue for the bag and stamped flowers on to the tissue to match the  same flower I stamped on this card.  (Tissue is not shown here...sorry).
 
 
Hope you like this Pinterest idea as well as I did?  Now...I'm truly sorry I can't give credit to who ever posted this idea on Pinterest.  If you know...please let me know and I will give them a shout out here.
 
Thanks for stopping and hope you'll return soon for more inspiration. 


Don't Forget To Leave A Comment...

Related Posts Plugin for WordPress, Blogger...