Monday, July 29, 2013

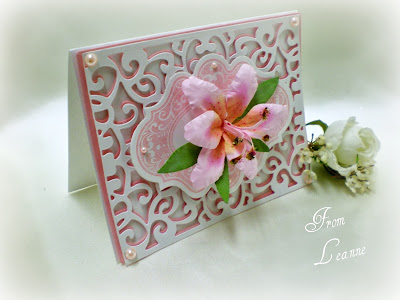
Get Well Wishes...


Two of these stamps I used on this card happen to be two of my favorites.  Yes...you might guess it.  It's the "En Francais" Stamp from Stampin' Up and the small scroll stamp from "French Foliage".


It seems on this card I used several different stamp sets together.  I also used the flower from Stampin' Up's "Love & Sympathy" set.  And...the green leaves are also from Stampin' Up's "French Foliage".


The pink flower is from my "Slice" Machine.  The white leaves are from my Die Cut...Joy Crafts Vintage Flourishes #6003.   I love it when I can mix and match so much and come up with something pretty like this ended up as.


I sent this on right away to a friend from church who had surgery to wish her well wishes.

I'd like to wish each of you "well wishes" who took time to stop by today. Thanks for stopping and leaving your sweet comments.  I love knowing you were here.


Sunday, July 21, 2013

For Your Bridal Shower...

 
A dear neighbor of mine asked me to please make a shower card for her for her nieces upcoming bridal shower.  She will be attending a shower for her soon so I didn't have to much time to waste.  I thought what could be sweeter than a shower umbrella on the card.
 
 
I embossed some white paper for the umbrella and then used the largest die cut circle I had, then cut off 1/4 inch from the top, giving it a umbrella look.  I also then scalloped the edge of the umbrella with one of my scalloped edge punch's (which never really showed).  I began making and layering my different sized pink flowers to the top of it and inside a tad. I also used leaves of different sorts to add interest with the flowers.  I added a metallic silver paper and made a handle and tip for the umbrella.   
 
This picture (above) shows the depth that this umbrella was.  I did however, pinch the center of the umbrella to make it look dimensional on the card.  While adding extremely strong dimensional dots to hold it in place in each corner and hold the dimensional shape. 
 
 
I used my Martha Stewart Hydrangea Punch and made simple little flowers and adding Iridescent colored Stickles into the center of each one, giving it more bling.  Also adding stickles here and there on the leaves.
 
 
The shower verse on the front is computer generated.  This is the computer generated verse I added to the inside.  When it was all done I gave it to my neighbor who really, really liked it. 

 
Hoping your day is showered with sun and happiness.  Happy Crafting!
 

Friday, July 19, 2013

Christmas In July Challenge

 
I am sharing this Christmas In July card with you today.  Rarely do I enter challenges due to the time involved. However, I entered this into a challenge at Joan's Garden # JG0718 this week.  I guess I feel that Christmas spirit coming....!  I've been working on my personal Christmas cards recently and this looks somewhat similar to what I will show you in Nov. 
 
Stay tuned....
 
UPDATE!!!
Just wanted to let you know that I did win this challenge at Joan's Garden's on Fri.
I am thrilled. Click link to go to her blog.
 

Sunday, July 14, 2013

Looking Through A Window...

How's the view from your home window? 
 Looking out of my home window... it is not quite as pretty but...it sure was fun dreaming while looking through this window.
 
 
 I began this card with these lovely card fronts that I purchased at my last craft show that were already die cut out and ready to use. This package included the clear plastic to line the window here that you really do not see with my picture. Sorry!    I loved fact that this vendor was kind enough to add the plastic inserts to the package. It makes it look more real like.  You where given three pieces to make this card.  One for the front, then the plastic in the center and then one to glue to the inside to finish is off nicely as to not see the plastic when opening the card. 
 
First..... you are given a template to cut the center of your plain white card stock with a Xacto knife to cut the same shape of the window and then add and glue your purchased front, back and center to your card.
 
 
Being my first window card, I wanted to put a scene behind the window that was not a stamped image as the vendors exampled cards were on her display.  So I made my own scene from several different stamps I had in my stamp collection.
 

I began my scene with a center blue lake with my chalk inks and dobbers to make the lake. I then stamped my pine trees and scruffy tree tops while adding a few little leaves with my Tom Bow brown pen to the scruffy tree tops.  I also used my brown Tom Bow pen to add bark looking centers to the stamped pine trees. I also hand drew the tiny birds flying in the sky and clouds.

 
I then used my green and brown chalk inks blending the colors to make a brown and green shore line.  I used a stamp of tree branches I had to add a grassy shore while adding cat tails and sage brush to the scene. I also used my Tom Bow pen to try and add (hand drawn) small clumps of grass to the look here?   
 
I then cut out my two die cuts from Joy Vintage Flourishes of #6003/0300 (flower) and #6003/0032 (flower branch).  I then popped them up with pop dot's to add depth and added stickles to the branches and flower to add dimensional looking color on the leaves.  I also added three tiny white butterflies for more interest.
 
 
Next time I make another window card with the other back and fronts I purchased, I plan on using a stamped image to the windows scene for a different look than this.

 
It's been a pleasure having you here today. 
Why not leave me a little comment before leaving to let me know you where here.   
I'd love hearing from you...

Sunday, July 7, 2013

Sizzix Thinlits Die Cut Lily...


In May this year I also attended another stamp show and picked up this new die cut from a booth
 The die cut is from "Susan's Garden" made by Sizzix.  I thought the lily would make a nice addition to my crafting supplies.  So I went home and got into the new die cut. I'm just getting around now to posting this card as I finally found a pretty background to attach the lily to.   The lily is a bit tricky to assemble so I was sure to make directions and pictures below to help you... should you decide to purchase this lovely die cut?

 
As you will notice the height of the flower when attached to your card can be a bit tall for a standard size envelope.  However, I did manage to figure out how to mail it or hand deliver it eventually.  I will show you my idea below.
 
 
At my last stamp show last week I also picked up this pretty new background die cut from "Ellentina Cutting Dies" Classic Collection.   I decided this would make a perfect background for this lily.

 
I then cut one die cut in all white and one in pink and then slightly overlapped one over the other forming this pretty little color to off set it.
 
 
Now here is the piece resistance I promised you on how to mail it or hand deliver due to the thickness of the flower.  I used a clear cello box/boutique box from "Denami Design" size 4-3/4" x 6".   I purchase several different sized box's last year and have them on hand for different gifting purposes.  I also understand you can take the box and wrap the outside with your address on it and the Post Office will send it for you?
 
 
Thanks for stopping today and below I have left directions on how I made this lily for you!


DIRECTIONS:
 
Sizzix Thinlits Die Set, Flower, Lily
by Susan Tierney-Cockburn
 
Here are pictures and some directions to help you see how I worked this flower.
 
 
I began by cutting out all pieces from the Sizzix packet and taking a leaf and coloring it in the center for each one.  I used chalk inks and used my ink dobbers on the edge of my dobber  to color the center a darker pink and then added a little yellow to the center over the pink area.  (This picture does not show the yellow area here.  But below it does.)  I then took my Tom Bow pink pen and made a freckled effect on the flower petal as most lilies have.
 
 
I then took my Stylus pen and began to press the edges on the back side to form a more realistic petal.
 
 
I then pinched each petal in the center after pressing the edges with my Stylus pen.
 
 
I colored yellow tips  on both sides of the stamen.  I also colored my six sided center but discovered it didn't really need coloring?  A plain yellow center is fine because it really will not show your yellow colored tips once all the petals are attached correctly to the center piece.
 
 
I took my tacky glue and tapped the end of it into the glue and used my Stylus pen to hold it for a minute or two until it was tacky enough to hold it's self in place.  Some people put the flower into a egg styled plastic carton (that can be purchased separately) to let the petals dry.  I did not purchase a egg carton!  It seemed the glue I used dried quite quickly.
 
 
I then took my leaves and adhered them with my tacky glue to the bottom portion.
 
 
I then rolled my stamen with tweezers into a tight circle and applied tacky glue to the ends and dipped it into my flower soft.  This gives it the effect of the flowers stamen.
 
 
Then I dipped the bottom of the stamen into tacky glue again and glued it into the center of my flower.

 
Here is my finished product! 
 
Have a wonderful week!


Don't Forget To Leave A Comment...

Related Posts Plugin for WordPress, Blogger...