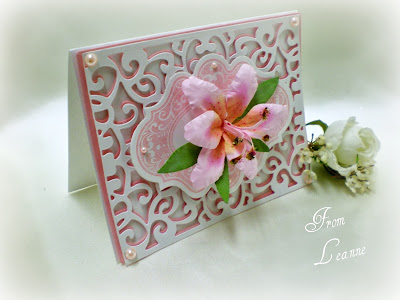
In May this year I also attended another stamp show and picked up this new die cut from a booth
The die cut is from "Susan's Garden" made by Sizzix. I thought the lily would make a nice addition to my crafting supplies. So I went home and got into the new die cut. I'm just getting around now to posting this card as I finally found a pretty background to attach the lily to. The lily is a bit tricky to assemble so I was sure to make directions and pictures below to help you... should you decide to purchase this lovely die cut?
As you will notice the height of the flower when attached to your card can be a bit tall for a standard size envelope. However, I did manage to figure out how to mail it or hand deliver it eventually. I will show you my idea below.
At my last stamp show last week I also picked up this pretty new background die cut from "Ellentina Cutting Dies" Classic Collection. I decided this would make a perfect background for this lily.
I then cut one die cut in all white and one in pink and then slightly overlapped one over the other forming this pretty little color to off set it.
Now here is the piece resistance I promised you on how to mail it or hand deliver due to the thickness of the flower. I used a clear cello box/boutique box from "Denami Design" size 4-3/4" x 6". I purchase several different sized box's last year and have them on hand for different gifting purposes. I also understand you can take the box and wrap the outside with your address on it and the Post Office will send it for you?
Thanks for stopping today and below I have left directions on how I made this lily for you!
DIRECTIONS:
Sizzix Thinlits Die Set, Flower, Lily
by Susan Tierney-Cockburn
Here are pictures and some directions to help you see how I worked this flower.
I began by cutting out all pieces from the Sizzix packet and taking a leaf and coloring it in the center for each one. I used chalk inks and used my ink dobbers on the edge of my dobber to color the center a darker pink and then added a little yellow to the center over the pink area. (This picture does not show the yellow area here. But below it does.) I then took my Tom Bow pink pen and made a freckled effect on the flower petal as most lilies have.
I then took my Stylus pen and began to press the edges on the back side to form a more realistic petal.
I then pinched each petal in the center after pressing the edges with my Stylus pen.
I colored yellow tips on both sides of the stamen. I also colored my six sided center but discovered it didn't really need coloring? A plain yellow center is fine because it really will not show your yellow colored tips once all the petals are attached correctly to the center piece.
I took my tacky glue and tapped the end of it into the glue and used my Stylus pen to hold it for a minute or two until it was tacky enough to hold it's self in place. Some people put the flower into a egg styled plastic carton (that can be purchased separately) to let the petals dry. I did not purchase a egg carton! It seemed the glue I used dried quite quickly.
I then took my leaves and adhered them with my tacky glue to the bottom portion.
I then rolled my stamen with tweezers into a tight circle and applied tacky glue to the ends and dipped it into my flower soft. This gives it the effect of the flowers stamen.
Then I dipped the bottom of the stamen into tacky glue again and glued it into the center of my flower.
Here is my finished product!
Have a wonderful week!


Absolutely Stunning Leanne. I love the STC flowers and her tool set makes an amazing difference too. Hugs Rita ,
ReplyDeleteStunning card Leanne and love your gorgeous background die and of course that beautiful flower...thank also for the tutorial of how your flower was made....
ReplyDeleteAnne
Wow! Beautiful card! A lot of work, but well worth it. Your step by step tutorial was very well done. Thanks for sharing.
ReplyDeleteWhat a stunning card Leanne..............and the flower is so beautiful. Thanks for sharing such a fab tutorial.
ReplyDeleteThank You too for visiting my blog and leaving such a kind comment
Crafty hugs
Annie
Leanne, your lily is beautiful and you created such a gorgeous card base to show it off. You did a wonderful tutorial.
ReplyDeleteI love your lily card and the Ellentina Die background is a great touch!
ReplyDelete